Android中使用drawable资源实现圆角按钮
分类:Android, Java
阅读 (3,355)
Add comments
1月 252017
转载请注明原文地址:http://bcoder.com/java/implement-rounded-rectangle-button-by-drawable-resources-in-android
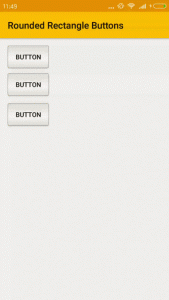
本文将介绍不使用外部图片,通过android的drawable资源实现圆角按钮的效果,并且在按钮按下时背景也会发生变化。使用到的drawable资源类型,shape和selector,效果图如下所示:
首先在res/drawable中新建一个资源文件,全名为round_rect_btn_normal.xml,文件内容为;
|
1 2 3 4 5 6 7 8 9 10 11 12 13 14 15 |
<?xml version="1.0" encoding="utf-8"?> <shape xmlns:android="http://schemas.android.com/apk/res/android" android:shape="rectangle"> <gradient android:startColor="#dcdcdc" android:endColor="#dcdcdc" android:centerColor="#f5f5f5" android:angle="90" android:centerX="0.4" android:centerY="0.4" android:type="linear"></gradient> <stroke android:color="#aaaaaa" android:width="1dp"></stroke> <corners android:radius="3dp"></corners> </shape> |
第二步再为按钮按下时创建一个相关的背景资源,在res/drawable中新建一个名为round_rect_btn_pressed.xml的文件,文件内容为:
|
1 2 3 4 5 6 7 8 9 10 11 12 13 14 15 |
<?xml version="1.0" encoding="utf-8"?> <shape xmlns:android="http://schemas.android.com/apk/res/android" android:shape="rectangle"> <gradient android:startColor="#cccccc" android:endColor="#cccccc" android:centerColor="#f5f5f5" android:angle="90" android:centerX="0.4" android:centerY="0.4" android:type="linear"></gradient> <stroke android:color="#aaaaaa" android:width="1dp"></stroke> <corners android:radius="3dp"></corners> </shape> |
第三步,把这两个资源组合起来,使背景同时具有正常状态和按下状态的效果,在res/drawable中新建一个名为round_rect_btn_selector.xml的文件,并复制以下内容到文件中:
|
1 2 3 4 5 |
<?xml version="1.0" encoding="utf-8"?> <selector xmlns:android="http://schemas.android.com/apk/res/android"> <item android:state_pressed="true" android:drawable="@drawable/round_rect_btn_pressed"></item> <item android:drawable="@drawable/round_rect_btn_normal"></item> </selector> |
注意:不带state的item一定要放到最后一行。
第四步,如果现在就就想看效果的话,可以给TextView或者Button的background属性设置为@drawable/round_rect_btn_selector就能看到效果了;
第五步,为了保持代码的风格良好和以后的扩展方便,我们还是先建一个style吧,在res/values/style.xml中新建一个style,如下:
|
1 2 3 |
<style name="round_rect_btn_bkg"> <item name="android:background">@drawable/round_rect_btn_selector</item> </style> |
最后,把TextView或者Button的style属性设置为@style/round_rect_btn_bkg就可以,如下所示:
|
1 2 3 4 5 6 7 8 9 10 |
<Button android:text="Button" android:layout_width="wrap_content" android:layout_height="wrap_content" android:layout_below="@+id/button3" android:layout_alignRight="@+id/button3" android:layout_alignEnd="@+id/button3" android:layout_marginTop="16dp" android:id="@+id/button4" style="@style/round_rect_btn_bkg"/> |
好了,赶紧点击运行按钮试一下效果吧!
大家可以根据自己的需求,改变round_rect_btn_normal.xml和round_rect_btn_pressed.xml里的颜色值和边框属性等,以和自己的app的风格搭配。


 微信扫一扫,打赏作者吧~